Using Integrations
Integrations are where you connect NodeZero to the other tools your team runs, such as your SIEM (Security Information and Event Management), your vulnerability management platform, or your ticketing system, and decide what NodeZero sends to each one.
This page covers the Integrations Settings page: how it is structured, what every control and state does, and what to do when something goes wrong. Credentials and setup steps for each integrated service on a corresponding page per vendor.
Contents
- How Integrations Are Structured
- Getting to the Integrations Page
- The Three Tabs
- Connected Integrations
- Adding an Integration
- Workflows
- Activity Log
- Managing Instances Over Time
- Multi-Instance Patterns
- Troubleshooting
- Frequently Asked Questions
- Glossary
How Integrations Are Structured
An integration is assembled from four parts, each configured on top of the one before it.
| Term | What It Is | Example |
|---|---|---|
| Connector | The kind of system NodeZero can talk to. Built and maintained by Horizon3; you don't create these. | CrowdStrike • Falcon Next-Gen SIEM |
| Instance | Your specific tenant of that system, with its own credentials. You can have several per connector. | Develop - US, pointing at your US-2 Falcon tenant |
| Dataset | A named slice of what NodeZero produces. Each connector supports a specific list. | Pentest Data, Tripwires, Weakness Series, Rapid Response |
| Workflow | The rule that connects them: this dataset goes to this instance. | Pentest Data > Develop - US |
Connecting a Destination Does Not Send Anything to It
Connecting an instance proves that NodeZero can reach your system and that the credential works. No data moves until a workflow names that instance as a destination and that workflow is Active. The wizard says so on its final step:
Develop - US won't receive anything until a workflow names it as a destination.
Credentials and routing are separate steps because they are usually handled by different people. A platform engineer can connect a tenant without deciding what flows through it.
One Dataset, One Destination, per Workflow
A workflow carries exactly one dataset to exactly one instance. One dataset to two destinations is two workflows. Two datasets to one destination is also two workflows. Duplicate copies an existing workflow so you do not re-enter its details.
Getting to the Page
- Select your account name in the top-right of the NodeZero Portal.
- Go to Settings.
- Select the Integrations upper tab.
Alternate location
Some existing integrations might appear instead on the adjacent Integrations (Legacy) tab, a temporary location while Horizon3 expands the Integrations tab.
Who Can See and Change It
Integrations are configured at the account level, not per user. What you set up here applies to the account named in the top-right account switcher. Confirm you are in the right account before you begin, especially if you manage client accounts.
Everyone can see this page. However, only Org Admins can change anything on it.
| Role | On the Integrations Page |
|---|---|
| Org Admin | Full access – add, edit, verify, deactivate, and delete instances and workflows |
| User | Read-only. Can view instances, workflows, and the Activity Log, but cannot act on them |
Your own role is shown under Settings > My Settings > User > Role, and every user's role is
listed in the Settings > Users > Role column. H3 Admin and H3 Org Admin also appear in
that column. These are Horizon3 support roles, not roles you assign.
Changes to integrations are recorded in Settings > Audit Log.
Note on availability
Connectors are released individually. If a connector you expect isn't in the list, it might not be enabled for your account yet. Contact your Horizon3 representative.
Not on This Page: Tripwire Webhooks
Tripwire alerts can also be sent to Splunk Cloud and Microsoft Sentinel, but those are configured as webhooks under Settings > Tripwires Webhooks rather than as connectors here. Neither appears in the connector picker.
The Three Tabs
The Integrations page has three tabs:
| Tab | Answers the Question | Scope |
|---|---|---|
| Connected Integrations | What are we connected to, and is it healthy? | Instances, grouped by connector |
| Workflows | What are we actually sending, and where? | Routing rules, grouped by connector |
| Activity Log | What was sent, when, and did it land? | Every dispatch, across all vendors and instances |
Connection problems live on the first tab, routing problems on the second, delivery problems on the third.
Connected Integrations
Connect vendor instances and monitor their health. Configure what each instance receives on the Workflows tab.
The page lists every connector you have at least one instance for, as a card. Each card carries the
vendor logo, the connector name in Vendor • Product form, a one-line description of what that
connector does, and a count of instances on the right.
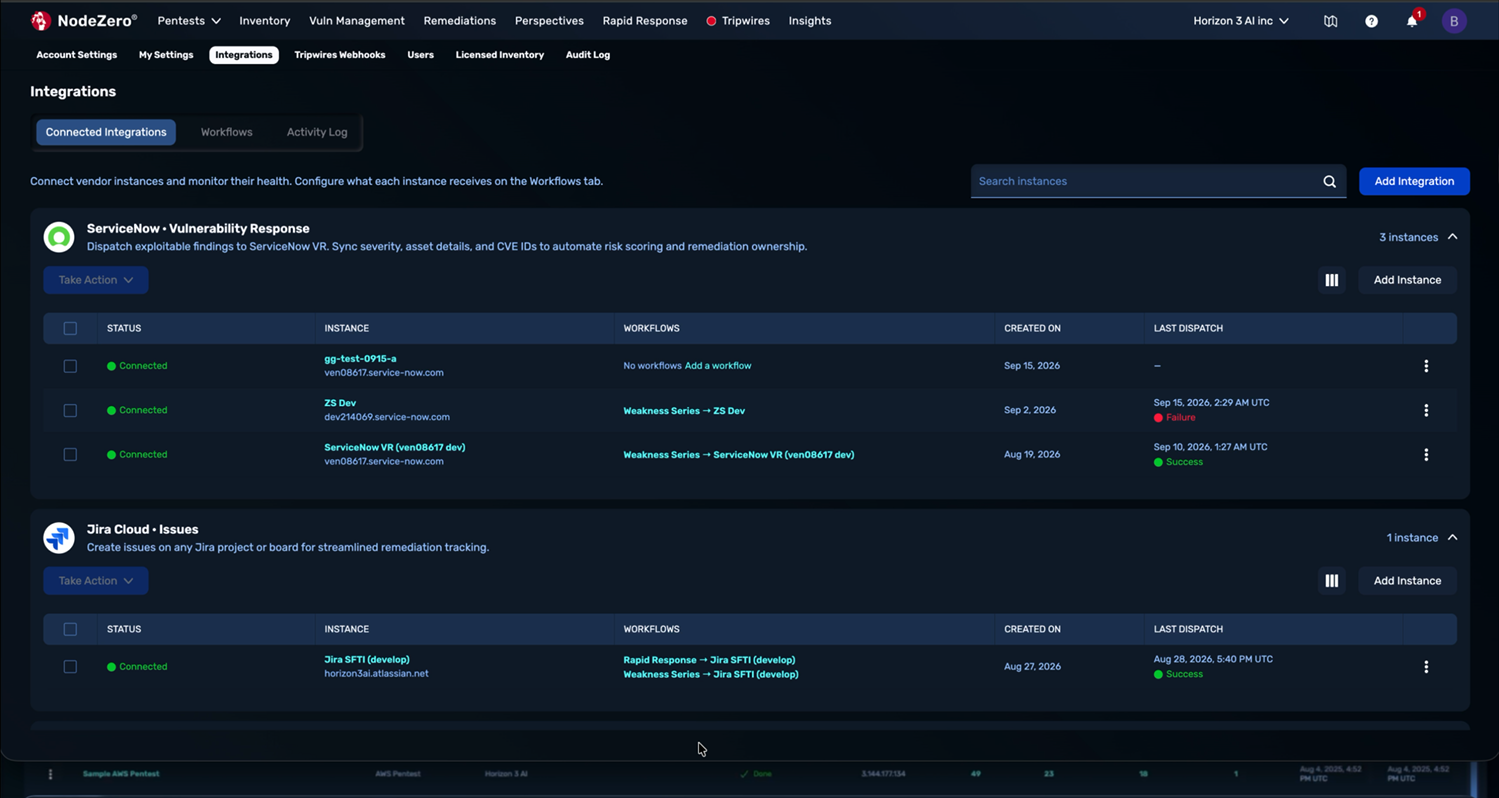
Connectors and instances
The Instance Table
Each connector card contains a table of that connector's instances:
| Column | What It Shows |
|---|---|
| Status | Connection health for this instance – see below |
| Instance | The label you gave it, with the endpoint underneath |
| Workflows | The workflows that target this instance, as links. If there are none, you get No workflows and an Add a workflow link |
| Created On | Date the instance was added |
| Last Dispatch | Timestamp and outcome of the most recent send to this instance, or – if nothing has been sent |
Instance Status
Instance rows use one of these statuses:
| Status | Meaning | What to Do |
|---|---|---|
| Connected | The last verification passed. NodeZero can reach the endpoint and the credential is valid. | Nothing |
| Action needed | A check is failing. The instance cannot be relied on as a destination. | Read the reason printed under the status – it names the problem. Then Edit Instance to correct it |
| Unverified | The instance has not been verified yet, or has not been re-verified since it changed. | Run Verify Now |
| Deactivated | The instance has been switched off. It keeps its configuration and history, and workflows that name it as a destination are paused. | Reactivate it when you want it back in service |
Action Needed Tells You Why in the Row
When an instance goes to Action needed, the reason appears directly beneath the status in the Status column:
🟡 Action needed
HEC rejected the token. Check the token is current and enabled for this connector.
The message names the failing element, usually the credential, the endpoint, or a permission. Read it before opening any menus.
Status reflects the connection; dispatch outcomes are tracked separately. An instance can show Connected while its Last Dispatch failed, which means the credential works but that particular send did not land. An instance at Action needed can still show a healthy Last Dispatch from before the credential changed.
Last Dispatch
Last Dispatch shows the outcome beneath the timestamp. A recent Success confirms the whole
path is working: NodeZero built the dispatch and the destination accepted it. A – means nothing
has ever been sent to this instance, which is expected while it has no active workflow.
Card Controls
- Add Instance – adds another instance of this same connector. Goes straight to the credentials step; you don't re-pick the connector.
- Take Action – bulk actions for the instances you have selected with the row check boxes.
- Toggle Columns (the columns icon) – show or hide columns in this table.
- Search instances – filters instances by label across every connector card.
- Add Integration – the full wizard, starting from connector choice. See the next section.
Row Actions
The Actions (⋮) menu at the end of each instance row holds, in order:
View Details · Add Workflow · Add Another Instance · Verify Now · Edit Instance · Deactivate · Delete Instance
See Managing Instances Over Time.
Bulk Actions
Tick the check box on one or more instance rows to enable Take Action, which offers Verify Now, Deactivate, Reactivate, and Clear Selection. Use it to verify a whole connector's instances at once, or to pause several at a time. Take Action is disabled until at least one row is selected.
Adding an Integration
Select Add Integration. A three-step wizard opens. The Summary panel on the right fills in as you go, so you can check the label and endpoint you have entered before submitting the credential.
Step 1 – Connector
Choose a connector. Your choice decides which data sets you can route, and how often they update.
Each card shows the vendor, the product, a one-line description, and chips listing the datasets that this connector accepts.
Connectors currently in the picker:
| Connector | Datasets | Notes |
|---|---|---|
| CrowdStrike • Falcon Next-Gen SIEM | Pentest Data, Tripwires | Streams findings into Falcon NG-SIEM as events |
| ServiceNow • Vulnerability Response | Weakness Series | Dispatches exploitable findings to ServiceNow VR; syncs severity, asset details, and CVE IDs |
| Jira Cloud • Issues | – | Grayed out and marked Coming soon. Not selectable |
Select a card, then Next.
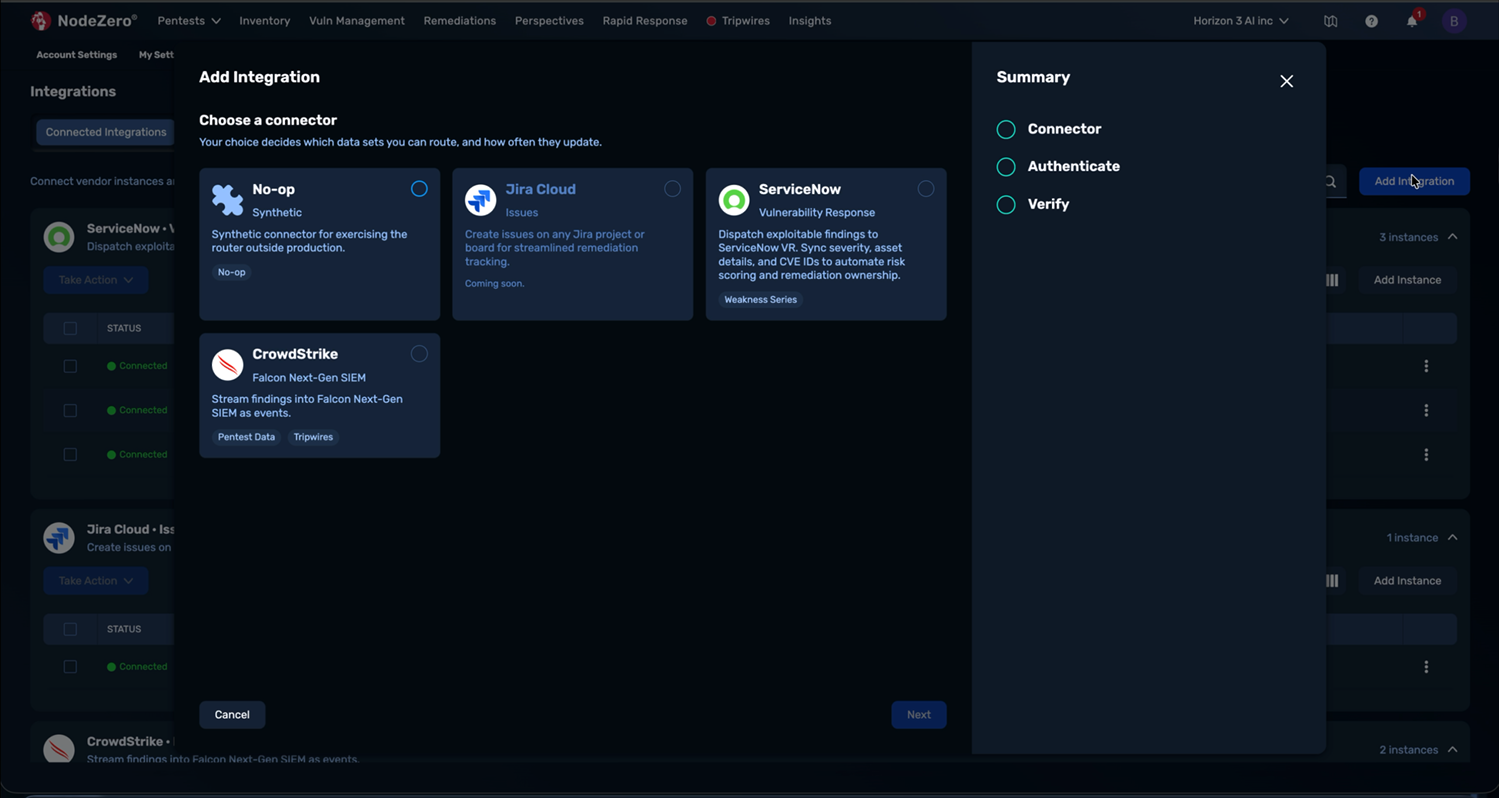
Choosing a connector
Step 2 – Authenticate
Instance details. Credentials are stored per instance and never shared. The fields below are what this connector requires.
The connector defines the fields on this step, so each one asks only for what it requires. One field is common to all of them:
- Instance label (required) – your name for this instance. It appears in workflow names, in
the destination picker and in the Activity Log, so make it unambiguous to someone who did not
set it up. The placeholder shows the pattern:
Manufacturing BU – Production.
The rest are whatever that connector needs to reach your system and authenticate to it. Expect an endpoint and at least one secret, sometimes with a username or a project identifier alongside. Required fields are marked; secrets are masked as you type.
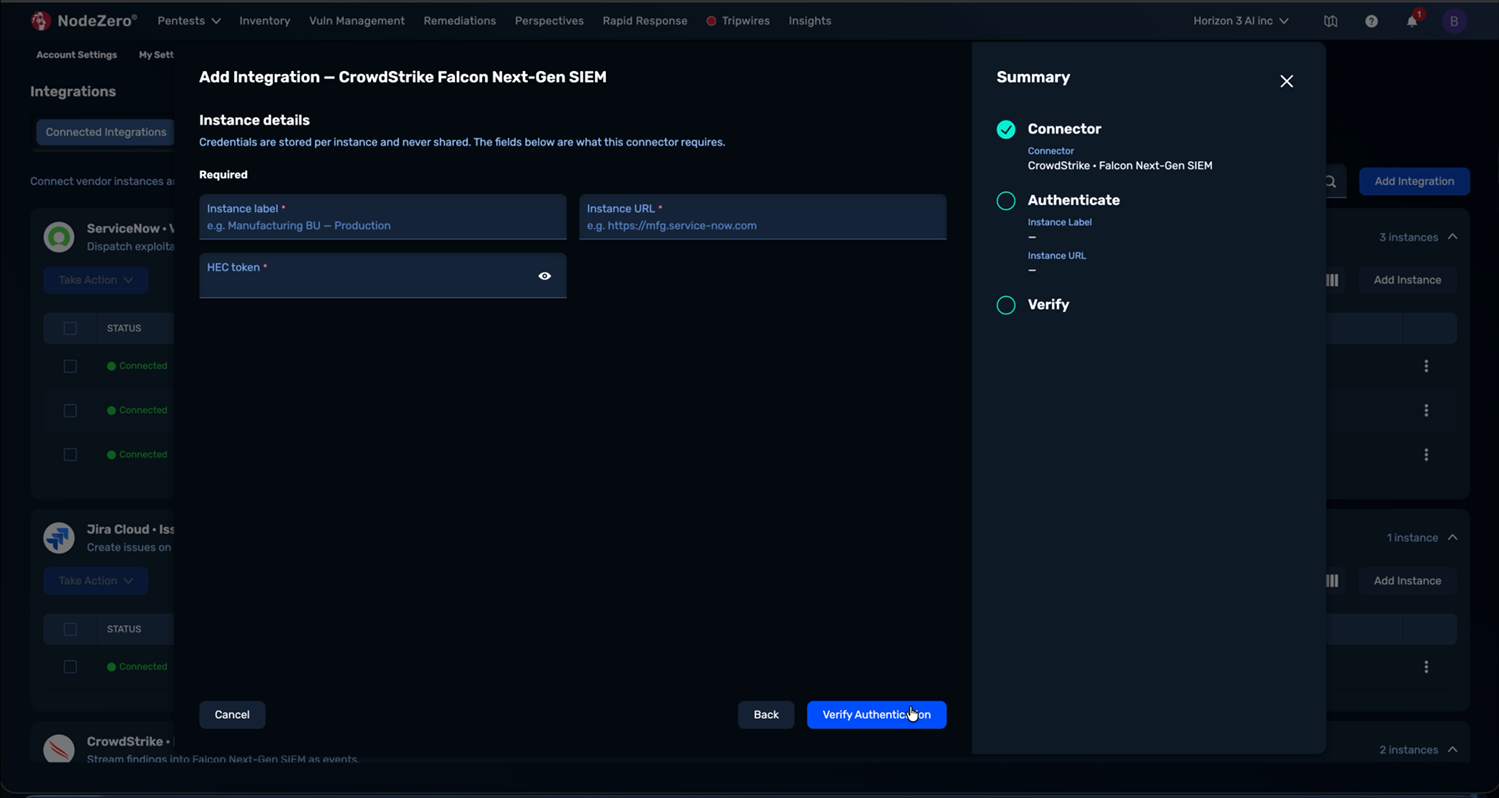
Adding instance details
Credentials are stored per instance and are never shared between instances. Two instances pointing at the same vendor hold two separate secrets. Secret fields are masked, with an eye icon to reveal what you typed before you submit.
Select Verify Authentication. NodeZero runs the save-time checks the connector defines, usually an endpoint-format check and a credential check. Nothing is sent to the destination at this stage.
If verification fails
Some vendors return a single generic rejection, so NodeZero cannot always identify which field is wrong and will ask you to review them all. Check the endpoint URL first, including its path and region, then re-paste the secret and confirm it carries no quotes or trailing whitespace.
Step 3 – Verify
Authentication passed on the previous step. This step checks that the credential carries the permissions and access the connector needs. How much can be confirmed depends on what the vendor exposes: some connectors can check access to named objects and record counts, others confirm the transport by sending a single synthetic test event.
On success:
✓ Connected and verified.
<Instance label> won't receive anything until a workflow names it as a destination.
You also get two toasts: Instance connected and All checks passed – this instance is healthy.
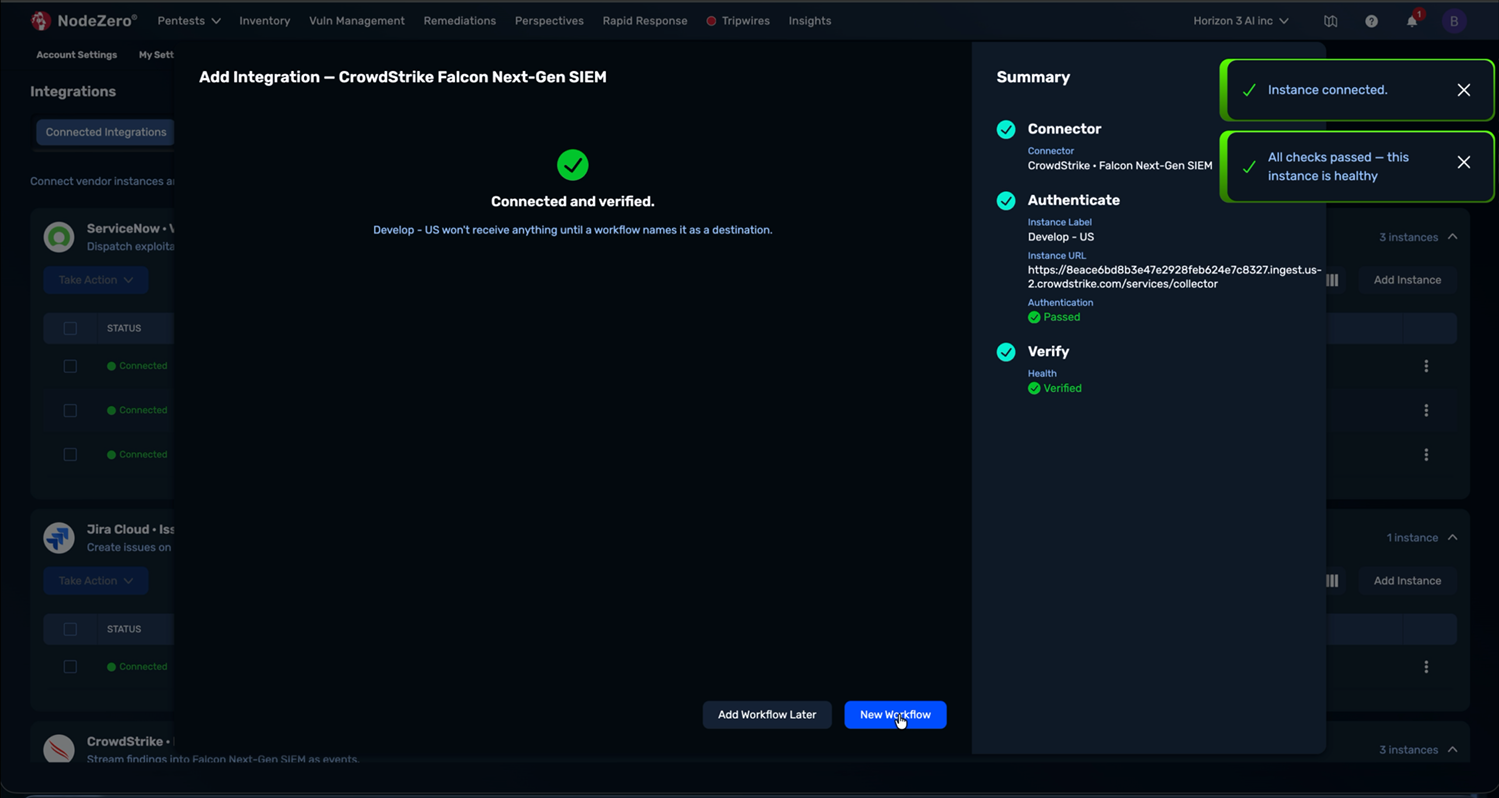
Success state: a connected and verified instance
Then choose:
- New Workflow – create the routing rule now, with this instance preselected as the destination. This is the only remaining step before data flows.
- Add Workflow Later – finish here. The instance appears on Connected Integrations with
No workflowsin its Workflows column.
Workflows
Route one data set to one destination. Duplicate a workflow to reach more destinations.
Workflows are grouped under the same connector cards as instances. Each row is one routing rule.
| Column | What It Shows |
|---|---|
| Status | Active (dispatches when triggered) or Inactive (saved but dormant) |
| Workflow | The rule's name, auto-generated as <Data set> > <Instance label> |
| Dataset | The dataset chip |
| Destination | The instance label with its endpoint underneath |
| Sync | How dispatch is triggered – Automatic or Manual trigger |
| Last Dispatch | Timestamp and outcome of the last run of this workflow |
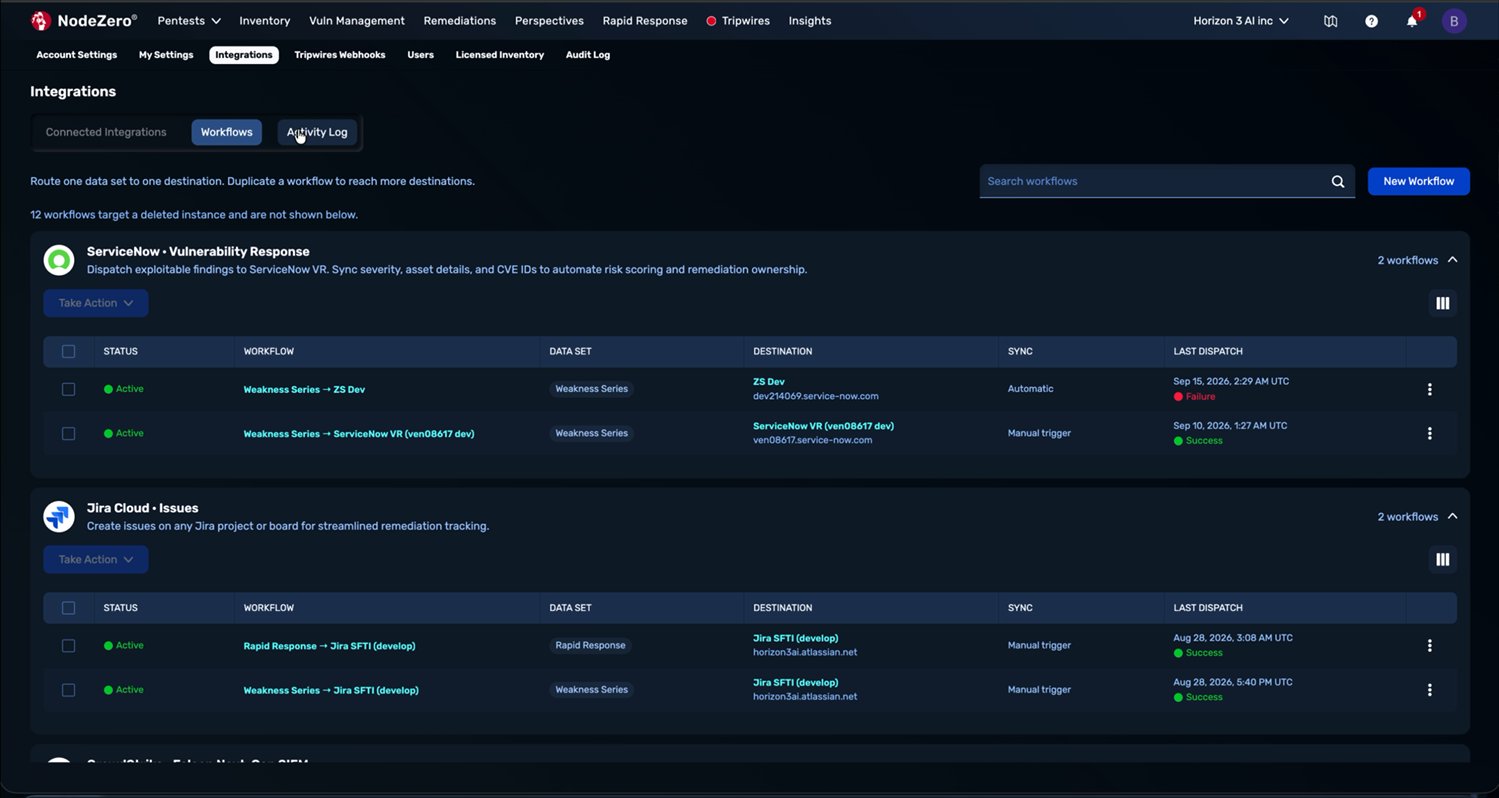
Workflows grouped by connector
Creating a Workflow
Select New Workflow (top right of the tab), or Add a workflow from an instance row, or New Workflow at the end of the Add Integration wizard.
Destination (required)
Every instance across every connector, in one list, shown as <Connector> – <Instance label>.
The destination determines which datasets you can send, so the Dataset list below repopulates
whenever you change it.
Dataset (required) Only the datasets the selected connector accepts appear here.
A workflow's dataset is fixed once it's created
You can change a workflow's destination later, but not its dataset. To route a different dataset, duplicate the workflow and change the dataset on the copy, or create a new one.
Sync The connector determines how the workflow is triggered, and the panel states which mode applies:
CrowdStrike NG-SIEM supports Automatic dispatch only. Dispatches on its own, as new data arrives.
| Sync Mode | Behavior |
|---|---|
| Automatic | NodeZero dispatches on its own when new data arrives, such as when a pentest completes or a tripwire fires |
| Manual trigger | Dispatches only when someone asks for it, from wherever that integration surfaces its trigger |
You do not choose between these. Each integration presents the trigger mechanism available to it, and the Sync column on the Workflows tab records which one a workflow uses. Where a connector dispatches on a manual trigger, the control sits on the page the data comes from. The Integrations page records that a workflow is manually triggered; it is not where you fire it.
Activate this workflow (check box, on by default)
Leave unchecked to save it without activating. Nothing dispatches until you turn it on.
Leave it checked for normal setup. Uncheck it to stage a rule for review before it starts sending, such as when you are pre-building routing for a tenant that is not live yet.
What gets dispatched to \<vendor>? An expandable Read More panel describing what the chosen dataset contains and when it is sent. This is the definitive description of what leaves NodeZero, so it is worth passing to whoever owns the destination system.
Select Save Workflow. You'll see Workflow saved and activated, and the row appears under its connector card.
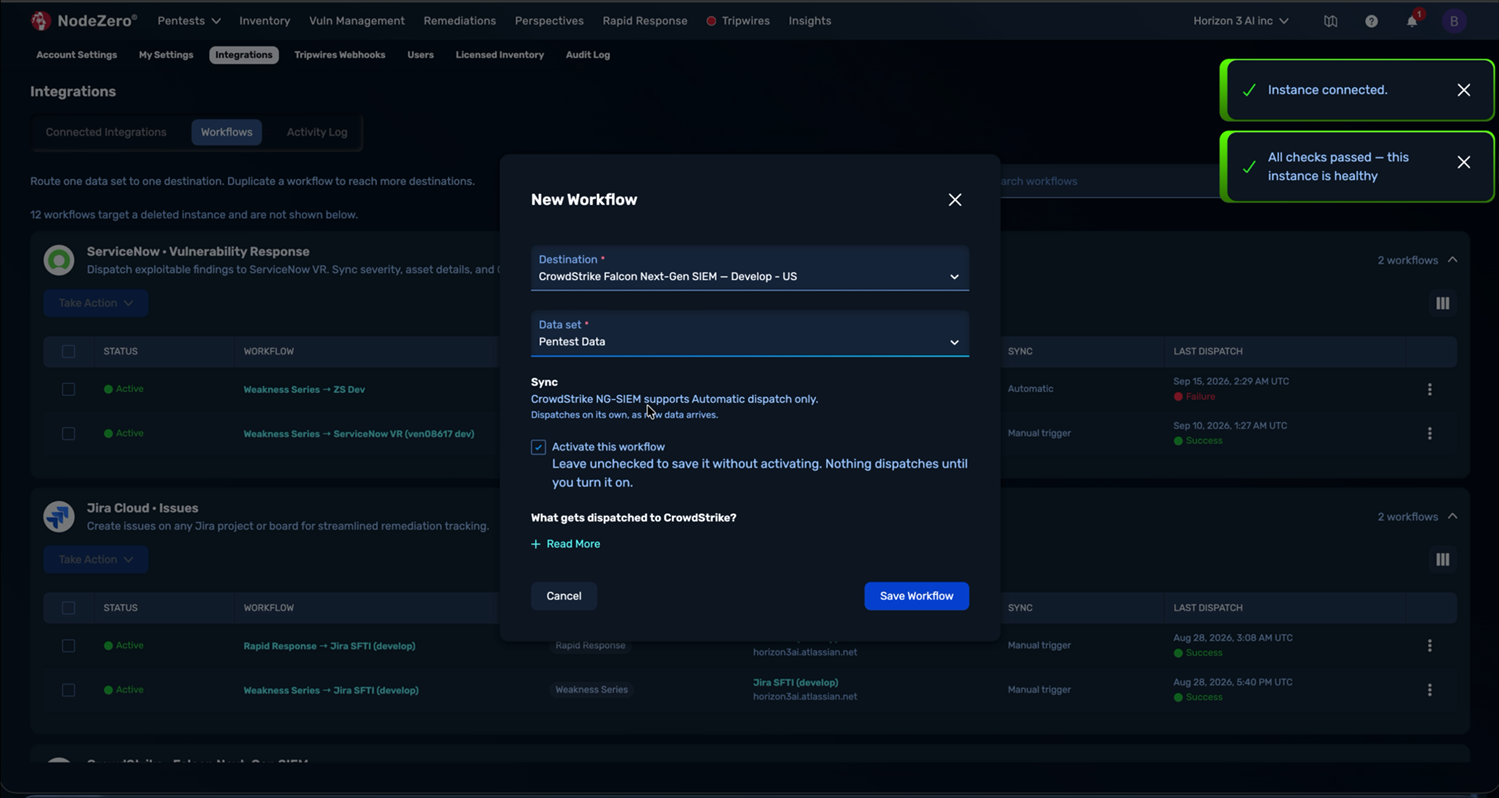
New Workflow modal – creating a workflow
Workflow Row Actions
The Actions (⋮) menu on a workflow row holds:
Edit Workflow · Duplicate · View Dispatch Info · Delete
Activation is handled in bulk. Select one or more workflow rows to enable Take Action, which offers Activate, Deactivate, and Clear Selection.
Editing a Workflow
Select the workflow name, or select Edit Workflow from its ⋮ menu. The same panel opens as Edit Workflow. Destination and activation are editable; Dataset is locked, with the reason shown inline.
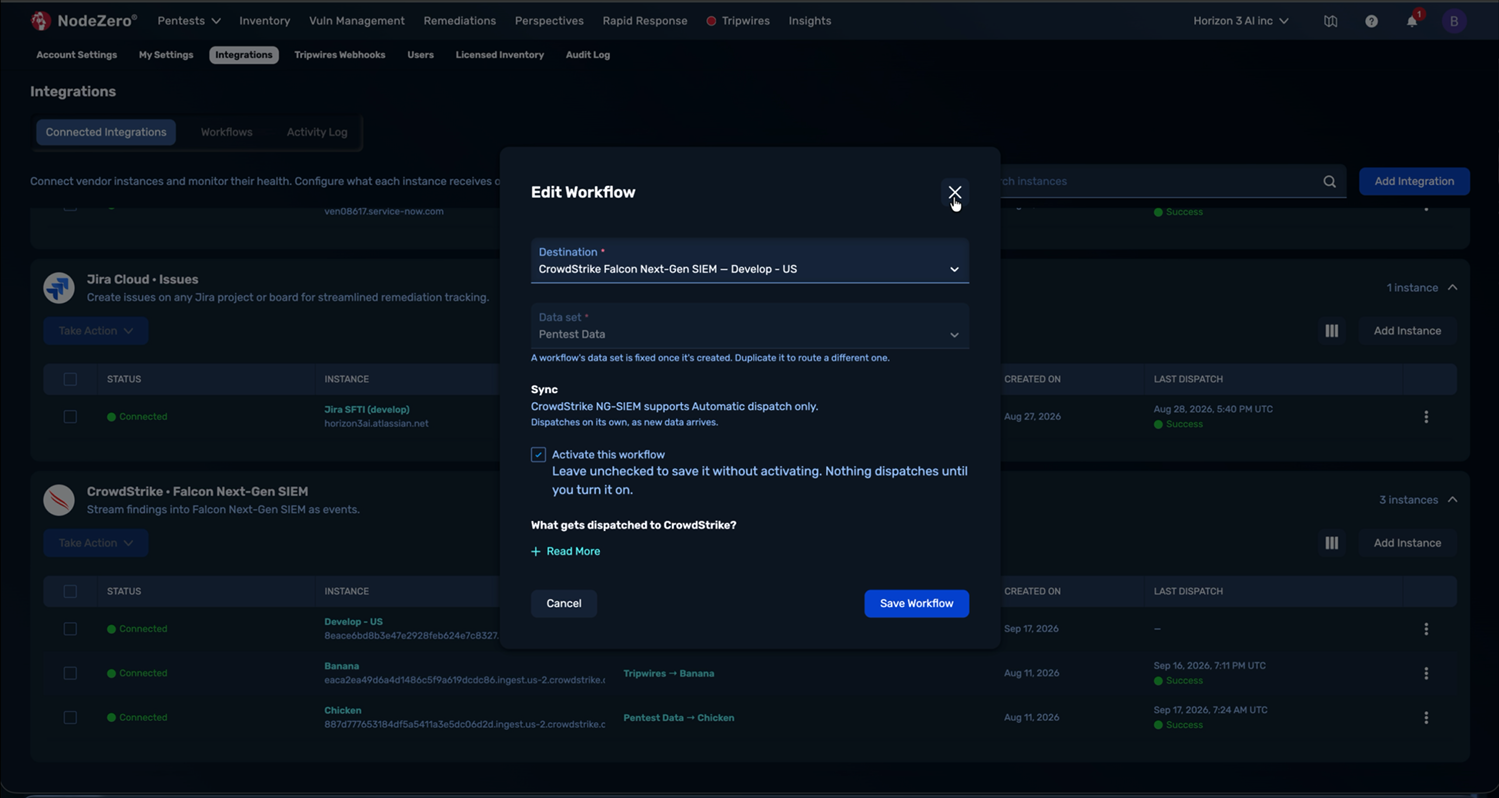
Editing a workflow, with the dataset locked
Duplicating a Workflow
Duplicate from the ⋮ menu copies the rule so you can point it at a second destination. Duplicating is how you send one dataset to several systems.
NodeZero warns you if a duplicate would be redundant:
Identical workflow already active. Both would dispatch the same data.
Deactivating and Reactivating Workflows
Select the workflow rows you want and use Take Action > Deactivate. This stops them dispatching without deleting anything:
1 workflow deactivated – history preserved
The workflow keeps its configuration and its dispatch history. Take Action > Activate turns it back on. Use this for a maintenance window on the destination system, or to stop traffic during an investigation.
Deactivating the instance pauses every workflow that targets it in one step. Use that when the whole destination is going offline.
Workflows Pointing at Deleted Instances
Deleting an instance deletes its workflows too, along with their dispatch history. See Deactivating and Deleting. This is the main reason to deactivate rather than delete.
You might also see a banner above the list:
12 workflows target a deleted instance and are not shown below.
These are workflows left behind by instances removed before deletion cascaded to them. Their destination no longer exists, so they cannot dispatch and there is nothing to fix. The count does not grow when you delete an instance today.
Activity Log
Every dispatch across all vendors and instances.
A chronological table of every send NodeZero has made, newest first.
| Column | What It Shows |
|---|---|
| Status | Outcome of this dispatch |
| Connector | Vendor and product |
| Dataset | Which dataset was sent |
| Records | How many records went in this dispatch. A dispatch with nothing new to send can legitimately show 0 or – |
| Destination | The instance label |
| Workflow | The workflow that caused it, as a link |
| Dispatched | Timestamp, in UTC |
| Details | View – opens the dispatch detail page |
| Actions | ⋮ menu. Present only on rows that have an action available – see Retrying |
Filter and search with:
- Search dispatches – free-text search across the log.
- Status column dropdown – narrow to Success, Failure, Partial, In progress, or Skipped.
- Workflow column dropdown – narrow to one workflow.
- Toggle Columns – show or hide columns.
Filters are held in the page URL, so a filtered view can be bookmarked or pasted to a colleague.
Dispatch Statuses
Each Activity Log row uses one of these outcomes:
| Status | Meaning |
|---|---|
| Success | The destination accepted the dispatch |
| In progress | Sending now. Record counts might show – until it completes |
| Failure | The destination rejected the dispatch, was unreachable, or the run itself errored |
| Partial | The dispatch reached some destinations but not all |
| Skipped | The dispatch was not carried out |
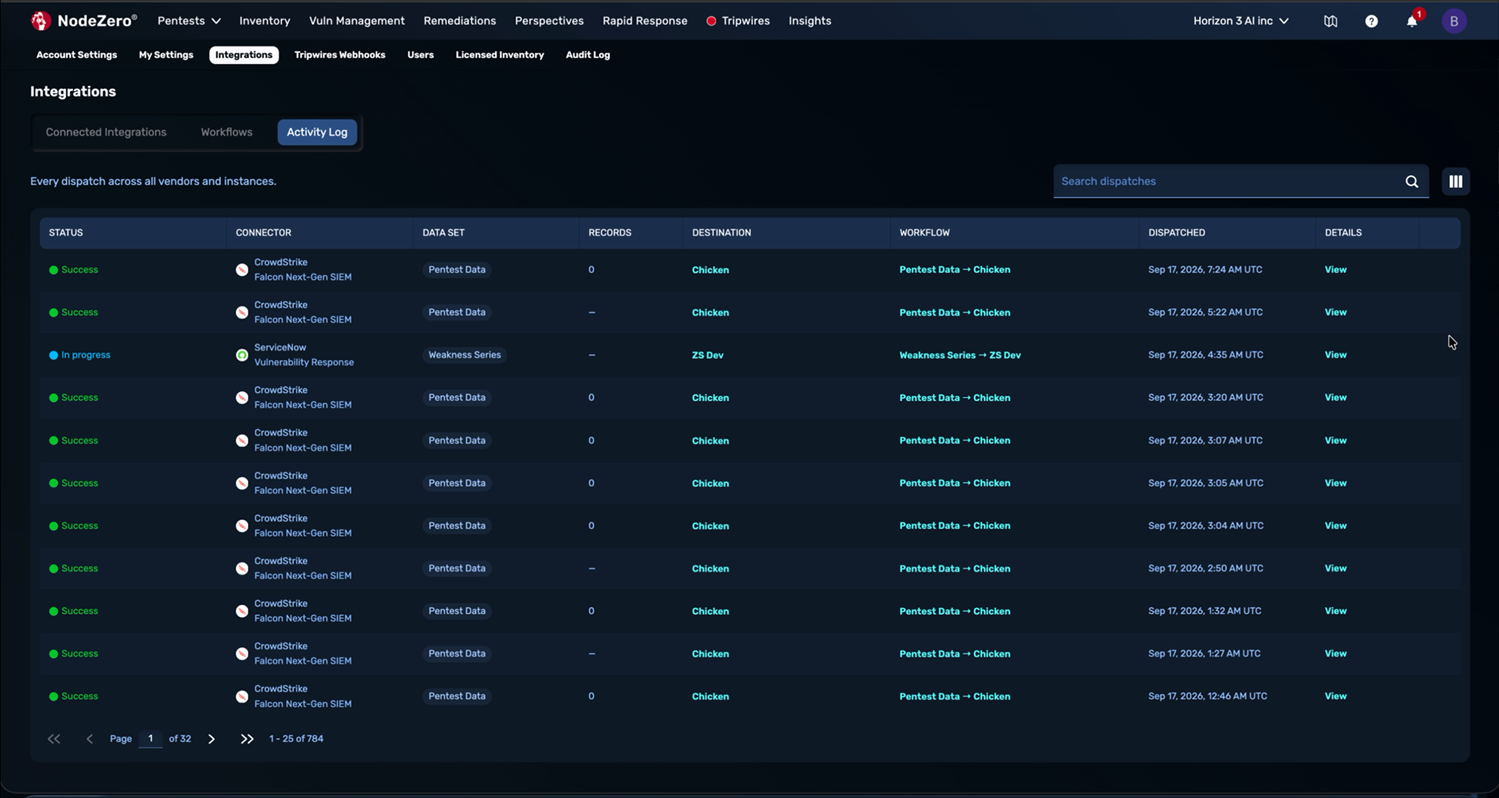
Activity Log showing dispatches, newest first
The Dispatch Detail Page
View in the Details column opens a page for that one dispatch, at
/settings/integrations/activity/<dispatch-id>. Each dispatch has its own URL, so you can paste
it into a ticket and the next person lands on that run. Back to Activity Log returns you to
the list.
The page carries a Summary (Status, Connector, Dataset, Records, Workflow, Sync, and Dispatched), a Delivery section naming the destination instance and its endpoint, and the Dispatch Log described below.
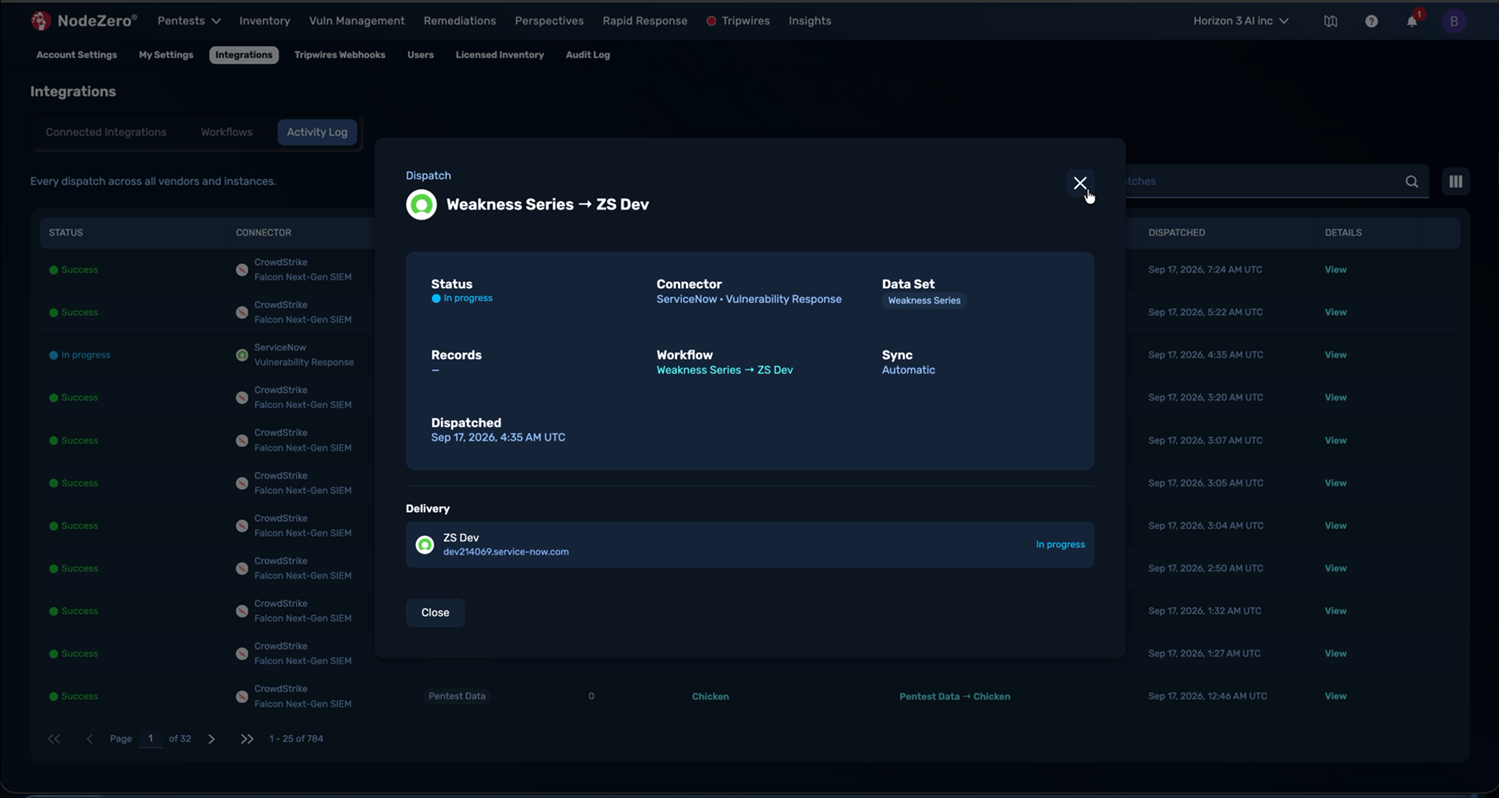
Dispatch Detail modal for a single dispatch
The Dispatch Log
The Dispatch Log records what happened inside a single dispatch. A count of entries sits above the table:
| Column | What It Shows |
|---|---|
| Created | Timestamp of the log entry, in UTC |
| Type | The kind of entry – for example, Error |
| Message | What happened |
A successful dispatch has little or nothing here. A failed one carries the reason it failed.
Messages can be raw
The Message column can carry the underlying technical error verbatim, including database and transport detail. When a message names internal components instead of your endpoint or credential, there is nothing to fix on your side: copy the dispatch page URL and send it to Horizon3 support.
Work a failure in this order:
- Read Status and the Delivery destination on the dispatch page.
- Read the Dispatch Log entries for the specific error.
- If the cause was transient, or destination-side and since fixed, Retry from the Activity Log row. Records already delivered are not resent.
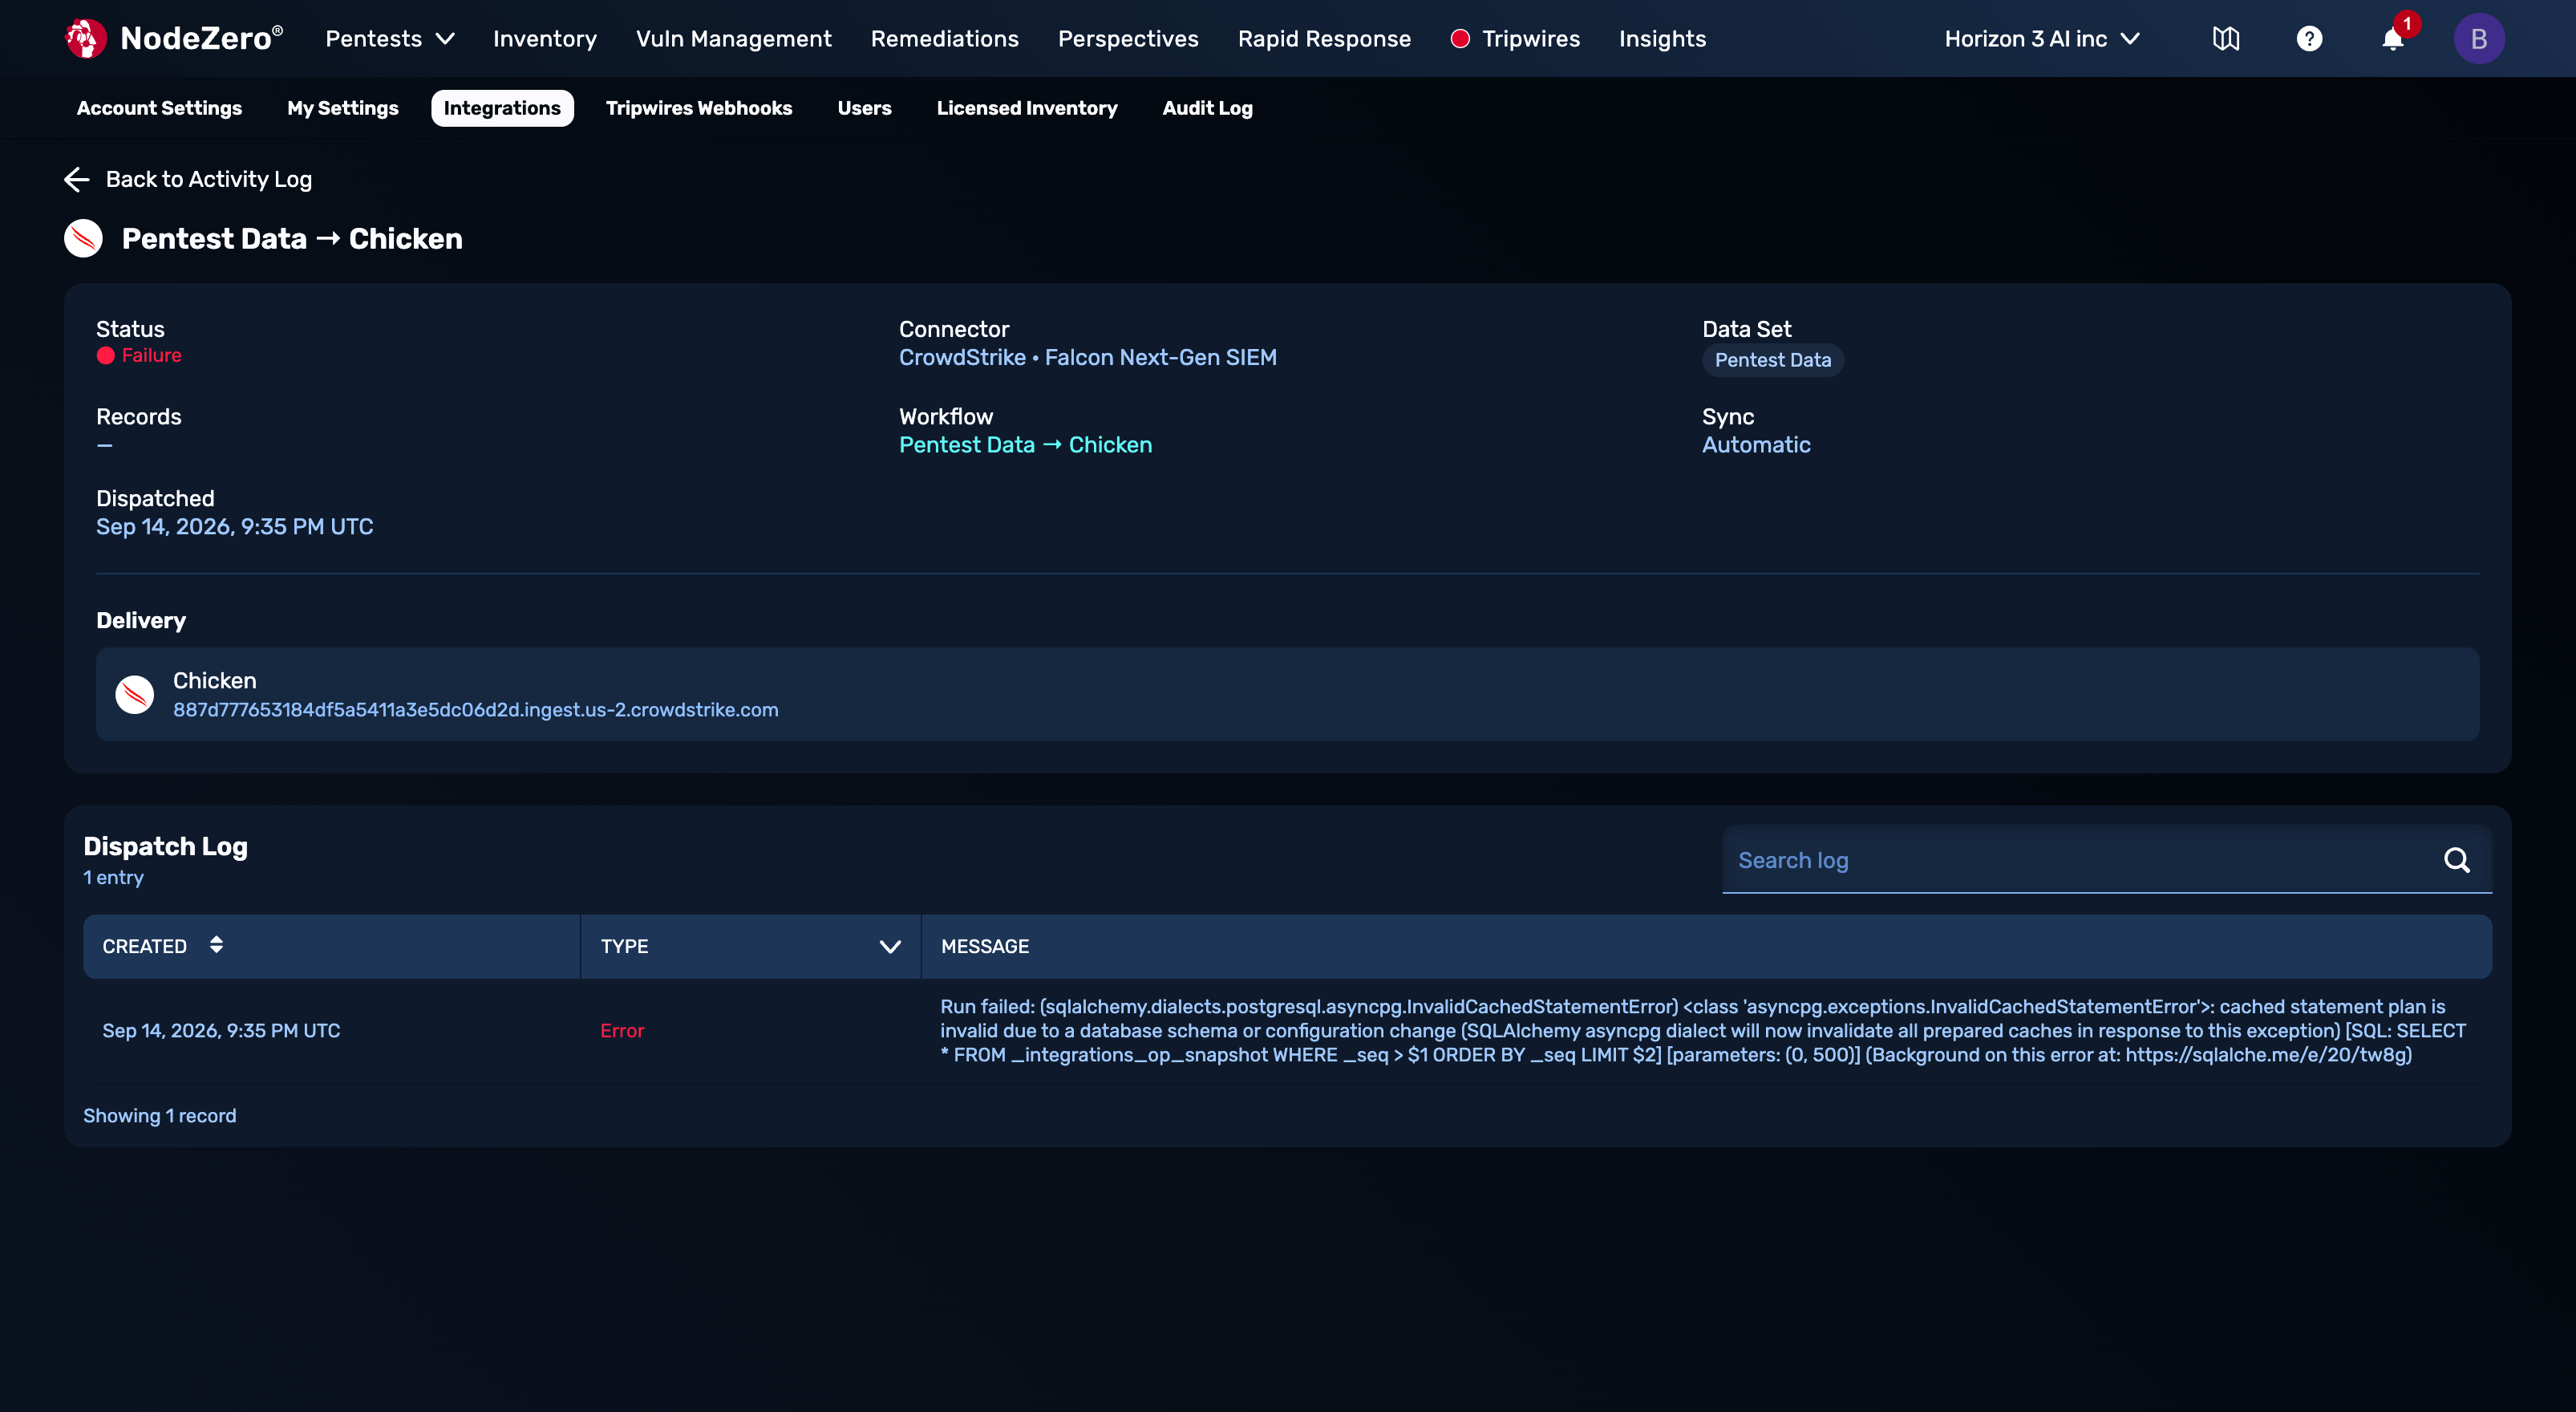
Dispatch Log entry for a failed dispatch
Retrying
Retry sits in the Actions (⋮) menu at the end of an Activity Log row, and appears only on rows that need it. A successful dispatch has no Actions menu, so an absent menu means there is nothing to retry.
Retries cannot duplicate data
Retrying a dispatch that partially landed does not resend the
records the destination already holds. The confirmation reads Retry queued – records already dispatched are never duplicated.
If a workflow has never dispatched, you'll be told This workflow has no previous dispatch to retry.
Empty State
No dispatches yet. Activity appears here once a workflow runs.
Three things cause this after a completed setup: the workflow is Inactive, no qualifying data has been produced yet (an Automatic workflow waits for a pentest to complete or a tripwire to fire), or the dataset has no records in scope.
A run with nothing to send produces no row
When a pentest completes and nothing is in scope for the dataset, NodeZero does not dispatch and the Activity Log stays as it was. Check the workflow's Last Dispatch and the instance status rather than reading the absent row as a fault.
Managing Instances Over Time
From an instance's ⋮ menu on Connected Integrations:
| Action | What It Does | When to Use It |
|---|---|---|
| View Details | Open the instance's detail view | Checking which verification check is failing |
| Add Workflow | Create a workflow with this instance preselected | Right after connecting, or adding a second dataset |
| Add Another Instance | Start a new instance of the same connector | Adding a second tenant, region, or environment |
| Verify Now | Re-run the connector's checks on demand | Confirming a fix; checking before a big pentest; routine spot-check |
| Edit Instance | Change the label, the endpoint, or the stored credential | Renaming; correcting an endpoint; rotating a secret |
| Deactivate | Switch the instance off, pausing the workflows that target it | Maintenance windows; temporarily stopping a destination |
| Delete Instance | Permanently remove the instance, its workflows, and their history | Decommissioning a tenant for good |
Rotating a Credential
Replace a secret through Edit Instance; there is no separate rotate action. The secret field behaves differently from the others:
Leave blank to keep the stored credential
The stored secret is never displayed back to you. Leave the field empty and your existing credential is preserved while you change the label or endpoint; type a new value and it replaces the old one on save.
Editing is the right response to an expired or revoked token. It preserves the instance, its label and every workflow pointing at it. Deleting and recreating does not.
Saving an edit re-verifies the instance, so there is no need to run Verify Now afterwards. A
change that breaks the connection moves the instance to Action needed and prints the reason
under the status, such as HEC rejected the token. Check the token is current and enabled for this connector.
A save runs the authentication check. Run Verify Now to re-run the full set of health checks: before a large scheduled pentest, or to confirm a fix made on the vendor's side.
Verifying on Demand
Verify Now re-runs the connector's checks. You'll see Verifying <instance>… while it runs,
then either:
✓ 1 instance verified – all checks passed
or
1 instance could not be verified – open Details to see which check failed
A failed verification also leaves the instance at Action needed, with the reason printed in its row.
Deactivating and Deleting
Deactivate switches the instance off and pauses the workflows that name it as a destination:
1 instance deactivated – workflows that name it as a destination are paused
Nothing is lost, and Reactivate brings it back. Use it for a maintenance window on the destination system or an ingest-budget squeeze.
Delete Instance is permanent, and removes more than the instance:
Deleting removes the instance, its 2 workflows, and their dispatch history.
This can't be undone.
No audit trail of what was sent to a deleted instance survives. Deactivate instead if you might want that history.
Multi-Instance Patterns
Several instances of the same connector is a supported setup. Common reasons:
Regions and data residency. A separate tenant per region, each with its own endpoint and
credential. Label them with the region: Falcon – US-2, Falcon – EU-1.
Environments. A dev or staging tenant alongside production, so you can prove a change before
it reaches the SOC (Security Operations Center) queue. Put the environment in the label rather than leaving it implied:
Develop - US, Production - US.
Business units or subsidiaries. Separate tenants for separately-run parts of the organization.
Label with the Business Unit: Manufacturing BU – Production.
Migration. Run the old and new tenant in parallel by duplicating each workflow onto the new instance, confirm both are landing in the Activity Log, then deactivate the old workflows and delete the old instance.
Naming Instances
In the destination picker, the label is all that distinguishes two instances of the same connector. Sending proof of exploitation to the wrong tenant is a security incident, so make labels hard to confuse. Recommended pattern:
<Scope> – <Environment>          Manufacturing BU – Production
<Vendor region> – <Environment>  Falcon US-2 – Production
Avoid placeholder names, and avoid two labels that differ by a single character.
Troubleshooting
Work through these in order.
| Symptom | Likely Cause | Fix |
|---|---|---|
| Instance is Connected, but nothing ever arrives at the destination | No workflow names this instance | Workflows tab > New Workflow, pick this instance as Destination |
| Workflow exists, nothing arrives | Workflow is Inactive | Edit the workflow and select Activate this workflow |
Workflow is Active, Last Dispatch is – |
Nothing has triggered it yet | For an Automatic workflow, this is normal until a pentest completes or a tripwire fires. Run an assessment |
Last Dispatch: Failure but status is Connected |
Credential is valid; the specific send was rejected | Activity Log > View the failed dispatch for the error, then Retry |
| Status is Action needed | A check is failing – usually an expired or revoked credential, or a changed endpoint | Read the reason printed under the status in the row, then ⋮ > Edit Instance to correct the endpoint or enter a new secret. Saving re-verifies |
| Status is Unverified | Never verified, or changed since last verification | ⋮ > Verify Now |
| Status is Deactivated | Someone switched the instance off; its workflows are paused | ⋮ > Reactivate, or select the row and use Take Action > Reactivate |
| Verification fails at Authenticate | Wrong endpoint, wrong secret, or a path/region mismatch | Re-check the endpoint character for character, including its path and region, then re-paste the secret cleanly |
| Dispatch shows Partial | Some destinations accepted, others didn't | Open the dispatch detail and read the per-destination Delivery statuses. Retry – already-delivered records won't be duplicated |
| A connector you need isn't in the picker | Not enabled for your account, or not released yet | Contact your Horizon3 representative |
| Workflows have vanished from the Workflows tab | Their destination instance was deleted | Check the banner count at the top of the tab. Deleting an instance also deletes its workflows and their history, so recreate the instance and build fresh workflows |
| Can't change a workflow's dataset | Dataset is fixed at creation | Duplicate the workflow and set the dataset on the copy |
Frequently Asked Questions
Does connecting an integration start sending data? No. Connecting proves the credential works. Nothing is sent until an Active workflow names that instance as a destination.
Where are my credentials stored, and are they shared? Credentials are stored per instance and are never shared between instances. A stored secret is never displayed back to you. To replace one, use Edit Instance and type the new value into the secret field. Leaving it blank keeps the credential you already have.
Can I send the same dataset to two systems? Yes. Create one workflow per destination: Duplicate the first and change the destination on the copy. Each destination gets its own workflow row, status, and dispatch history.
Can one workflow send two datasets? No. One workflow carries exactly one dataset. Create a second workflow.
Can I filter what gets sent, such as criticals only or certain hosts only? Not currently. Each dataset has a defined scope, and the routing rule carries no user-configurable filters or transforms. The What gets dispatched? panel on the workflow describes what each dataset contains.
How do I test without touching production? Connect your vendor's non-production tenant as its own instance and route there first. Once that looks right, add the production instance and duplicate the workflows onto it.
Will a retry duplicate records in the destination? No. Dispatches carry an idempotency key, so records already delivered are never sent twice.
How do I pause an integration temporarily? Deactivate the instance, which pauses every workflow that names it in one step. To stop only part of the flow, deactivate individual workflows instead. Both preserve history. Deletion is permanent and is not a way to pause.
What happens to my dispatch history if I delete an instance?
It is deleted with it. The confirmation states this: Deleting removes the instance, its N workflows, and their dispatch history. This can't be undone. Deactivate instead if you might
want that audit trail.
Is any of this per-user? No. Integrations are account-level configuration. Everyone with access to the account's settings sees the same instances and workflows. Changes are recorded in the Audit Log.
All the times are in UTC. Can I change that? No. Dispatch timestamps are shown in UTC throughout, so they line up with the timestamps in the destination systems.
Glossary
Connector – a supported destination type, built by Horizon3. It defines which credential fields are required, which datasets can be routed, and how dispatch is triggered.
Instance – one configured tenant of a connector, with its own label, endpoint, and credential.
Dataset – a named slice of NodeZero output. Which ones are available depends on the connector.
Workflow – a routing rule: one dataset > one instance. Active or Inactive.
Dispatch – a single send from NodeZero to a destination, triggered by a workflow. Recorded in the Activity Log.
Sync – how a workflow is triggered: Automatic (on its own, as new data arrives) or Manual trigger.
Idempotency key – the identifier attached to each dispatch that lets a retry skip records the destination already has.